Hydric Soil Indicators

The most common soil type we encounter in wetlands is the “F” group of hydric soils.  These are the loamy mineral soils.  The texture needs to be a fine sand or finer.  Usually, we are looking at silts and clays.

Of all the indicators in the “F” group, the two most common ones are the depleted matrix, “F3”, or the dark surface, “F6.”  It is not unusual to find both in the same soil pit.  Both indicators are dependent upon soil color as their hydric condition test.

There are many variations of color associated with the “F” indicators.  However, a basic rule of thumb is that they need to have a Munsell matrix chroma of 2 or less.  There are provisions for chromas greater than 2 found in some of the other indicators.  However, for the “F3” and “F6” we need to see colors that are at least as dark as a 2.

There is still some pushback from the old-time delineators on these new indicators.  For decades we used a single indicator for soil color.

  • Matrix chroma is 2 or less in mottled soils
  • Matrix chroma is 1 or less in unmottled soils

This must occur at a depth of 10 inches or the bottom of the “A” horizon whichever is shallower.

This definition served us well, but it is no longer in use.  However, when we look at the new “F” indicators we see that the old definition is buried in them (sorry for the pun).

One other oldie is the concept of mottling.  This term has been replaced with the concept of redoximorphic features.  We now refer to dark features as redox depletions and bright features as redox concentrations.  Mottling always meant a mix of soil colors.  However, it usually was expressed when the dark features were in the matrix (dominant color) and the bright features were individual masses.  The use of the redox concentrations and redox depletions is much more descriptive and a change for the better.

Thickness of the indicator feature is also a new concept.  Many of the “F” indicators not only require a specific soil color, but also a thickness associated with it.  For example, a matrix with a chroma of 2 must be at least 6 inches thick in order to count as a hydric soil feature.  To make this a bit more challenging some of these thickness requirements can be combined with other hydric soil indicators thickness   requirements to make up any missing thickness goals.  This only applies to certain indicators like the “F3” and “F6”.

The last caveat is that some of these features must occur within certain depth limits to count as a hydric soil feature.   You must see the feature start at a specified depth and then extend for a certain thickness.  On aspect of the “F3” requires that a depleted matrix must start in the upper 12 inches of the soil and extend for at least 6 inches.  Thickness and depth are combined.

The “F3” indicator is one of the most frequently found indicators.  It is referred to as a depleted matrix.   There is a tricky part to this indicator regarding the use of the US Army Corps Regional Supplements.  The definition of a depleted matrix is found in the glossary along with a nice graphic of what it means.  The problem is that the hydric soils section leads you to believe that the full description of the feature is found within they hydric soil indicator description.  It does not.  You need to check the glossary.

The description starts with the idea that you have a depleted matrix.  You need to know what a depleted matrix is.  This involves an analysis of the soil color and percent redox features.

A depleted matrix is:

Depleted matrix. The volume of a soil horizon or sub horizon from which iron has been removed or transformed by processes of reduction and translocation to create colors of low chroma and high value. A, E, and calcic horizons may have low chromas and high values and may therefore be mistaken for a depleted matrix. However, they are excluded from the concept of depleted matrix unless common or many, distinct or prominent redox concentrations as soft masses or pore linings are present. In some places the depleted matrix may change color upon exposure to air (reduced matrix); this phenomenon is included in the concept of depleted matrix. The following combinations of value and chroma identify a depleted matrix:

  • Matrix value of 5 or more and chroma of 1, with or without redox concentrations occurring as soft masses and/or pore linings, or
  • Matrix value of 6 or more and chroma of 2 or 1, with or without redox concentrations occurring as soft masses and/or pore linings, or
  • Matrix value of 4 or 5 and chroma of 2, with 2 percent or more distinct or prominent redox concentrations occurring as soft masses and/or pore linings, or
  • Matrix value of 4 and chroma of 1, with 2 percent or more distinct or prominent redox concentrations occurring as soft masses and/or pore linings (USDA Natural Resources Conservation Service 2010).

Common (2 to less than 20 percent) to many (20 percent or more) redox concentrations (USDA Natural Resources Conservation Service, 2002) are required in soils with matrix colors of 4/1, 4/2, and 5/2. Redox concentrations include iron and manganese masses and pore linings (Vepraskas, 1992).

Once you figure that out you just need to look for depth and thickness of feature.

A layer with a depleted matrix that has 60 percent or more chroma of 2 or less and that has a minimum thickness of either:

  • 2 in. (5 cm) if the 2 in. (5 cm) is entirely within the upper 6 in. (15 cm) of the soil, or
  • 6 in. (15 cm) starting within 10 in. (25 cm) of the soil surface.

The “F6” indicator does not require a depleted matrix.  It is described as a dark surface as follows:

A layer that is at least 4 in. (10 cm) thick, is entirely within the upper 12 in. (30 cm) of the mineral soil, and has a:

Matrix value of 3 or less and chroma of 1 or less and 2 percent or more distinct or prominent redox concentrations occurring as soft masses or pore linings, or

Matrix value of 3 or less and chroma of 2 or less and 5 percent or more distinct or prominent redox concentrations occurring as soft masses or pore linings.

I should add that distinct or prominent redox features are defined by the color contrast between these features.  Please check the Regional Supplement glossary for a full description.  We also printed it on our soil bandana.

These two soil indicators can also be combined to meet the thickness requirements of either feature.  This may vary by Regional Supplement so make sure to check with the Corps for any local interpretations.

Securing a Jurisdictional Determination

A Jurisdictional Determination, also known as a “JD”, represents a US Army Corps of Engineers’ determination of the presence and/or extent of “waters of the US” on any given property. However, there are two types of JDs. One represents the official findings of the Corps, and the other is more or less an estimate. Both JDs have their purposes. It is important to recognize the difference between the two types because one could get you into a lot of trouble.

Approved JDs

An approved JD (AJD) is an official Corps determination that jurisdictional “waters of the United States,” “navigable waters of the United States,” or both, are either present or absent on a particular site. An approved JD precisely identifies the limits of those waters and determined to be jurisdictional under the Clean Water Act and/or the Rivers and Harbors Act.

An approved JD:

  1. Constitutes the Corps’ official, written representation that the JD’s findings are correct;
  2. Can be relied upon by a landowner, permit applicant, or other “affected party” (as defined at 33 C.F.R. 331.2) who receives an AJD for five years (subject to certain limited exceptions explained in RGL 05-02);
  3. Can be used and relied on by the recipient of the AJD (absent extraordinary circumstances, such as an approved JD based on incorrect data provided by a landowner or consultant) if a CWA citizen’s lawsuit is brought in the Federal Courts against the landowner or other “affected party,” challenging the legitimacy of that JD or it’s determinations;
  4. Can be immediately appealed through the Corps’ administrative appeal process set out at 33 CFR Part 33

If wetlands or other water bodies are present on a site, an AJD for that site will identify and delineate those water bodies and wetlands that are subject to Clean Water Act jurisdiction, and serve as an initial step in the permitting process.

Preliminary JDs

Preliminary JDs (PJD) are non-binding; “… written indications that there may be waters of the United States, including wetlands, on a parcel or indications of the approximate location(s) of waters of the United States or wetlands on a parcel. Preliminary JDs are advisory in nature and may not be appealed.”

The main purpose of a Preliminary JD is speed a project along. There are several scenarios where this type of JD would accomplish this:

  1. An applicant, or other “affected party”, may elect to use a preliminary JD to voluntarily waive or set aside questions regarding CWA jurisdiction over a particular site. Usually in the interest of allowing the landowner or other “affected party” to move ahead expeditiously to obtain a Corps permit authorization where the “party” determines that is in their best interest to do so.
  2. For purposes of computation of impacts, compensatory mitigation requirements, and other resource protection measures, a permit decision made on the basis of a preliminary JD will treat all waters and wetlands that would be affected in any way by the permitted activity on the site as if they are jurisdictional waters of the U.S.
  3. Preliminary JDs are also commonly used in enforcement situations if a site may be impracticable, unauthorized, or for reasons that prevent an approved JD to be completed in a timely manner. In such circumstances, a preliminary JD may serve as the basis for Corps compliance orders (e.g., cease and desist letters, initial corrective measures). The Corps should support an enforcement action with an approved JD, unless it is impracticable to do so under the circumstances.

Which Should You Use?

It is the Corps’ goal to process both preliminary JDs and approved JDs within 60 days. The applicant or other affected party’s choice of whether to use a preliminary JD or approved JD should not affect this goal.

As the “waters of the U.S” definition is currently in a state of limbo, all future permits and JDs issued will be reviewed under the pre-2015 regulatory regime. Previously approved permits or JDs under the 2020 Navigable Waters Protection Rule are subject to review.

To learn more about the current guidance for wetland permits and JDs, please refer to U.S. EPA’s page on the current implementation of “waters of the U.S.”: https://www.epa.gov/wotus/current-implementation-waters-united-states

Wetland Soil Auger Buyer’s Guide

One of the most frequently asked questions by our wetland delineation students is, “what type of soil auger should I buy?”

A quick browse through any of the forestry supply companies’ catalogs and you are quickly overwhelmed. Who would have thought that there we so many different types of soil augers? Some of them are quite expensive. Many are modular and you end up buying part of an auger and have to order more parts. You do not want to drop a grand on an auger only to find out it is not what you needed or expected.

To help you get a handle on this, I have put together a pros and cons list of the most common soil augers used for wetland delineation. This list is based on my personal field experience with these augers. Each has its place so be prepared to buy a few. I do have a favorite all-around auger which I will also cover, but I own a bunch!

Tube Sampler

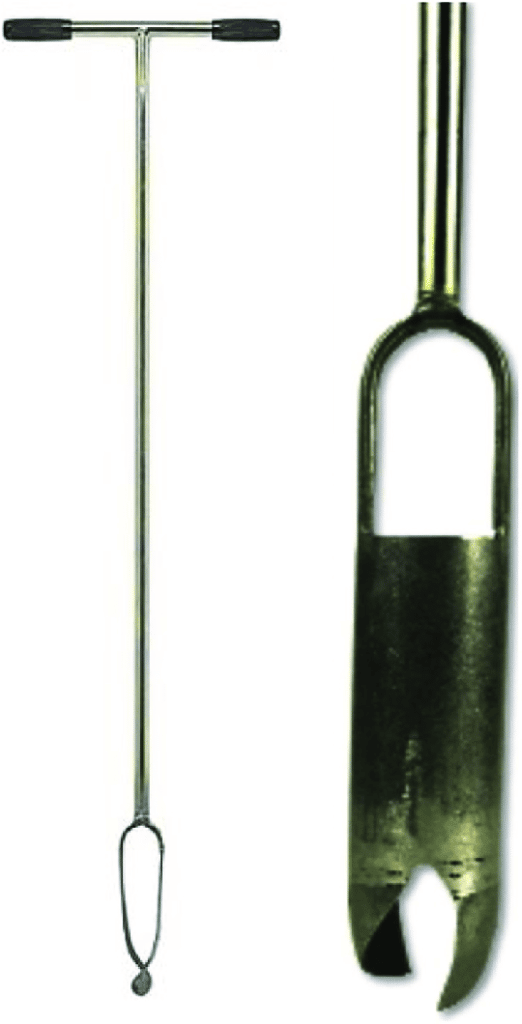
This is a favorite for the beginning wetland delineator. One of its biggest assets is that it is the cheapest, however, it has limitations. The basic construction is a simple tube that is cut open at the bottom. There is usually about a 16-inch half pipe slice that is used to examine the soil profile in-situ. The very end is a ring that everyone gets their fingers stuck in. A good one is about 24 inches in length with an opening extending about 16-18 inches. There is a short t-handle on the top. Sometimes this is detachable with a screw fitting. Others have the handle welded on. The former is a bit more expensive. One of the biggest advantages of this type of auger is the small footprint it makes. In glacial regions, it is sometimes the only auger that can get in between the rocks. It is also very handy for quick assessments. The biggest disadvantage is the relatively small amount of soil sample this auger extracts. Oftentimes, it just is not enough sample to make a wetland determination. Small rocks are also a problem as they will plug up the tube end. The issue of cleaning the sampler end out is also a challenge. It is sharp and just the right size to get your finger stuck. Use a stick to clean it out!

Screw Sampler

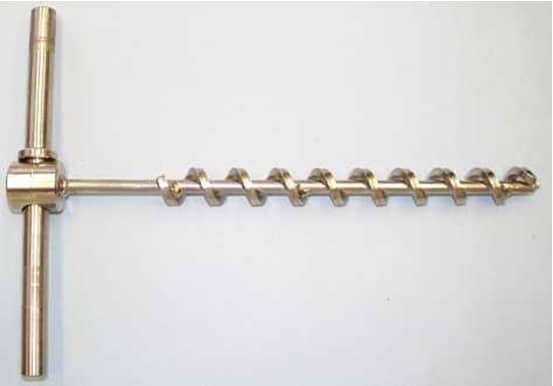
This auger looks like a giant corkscrew. The screw is about a foot long and is about 2-3 feet in total length. The screw is usually attached by extension bars that can be added to achieve a comfortable length. It has a slightly larger footprint than the tube sampler and is similarly useful in glaciated regions. The biggest challenge with using this auger is the ability to measure the thickness of a hydric soil feature. The screw blades are about .5 inches thick. This results in a stretching of the soil sample. It is hard to estimate how thick a feature may be using this auger. It also provides a very small soil sample.

Bucket Auger

This is probably the most common type of auger used by soil scientists, however, it is not necessarily used by wetland delineators. The basic design looks like a coffee can with one end open and the other end having two blades welded onto it. An extension bar connects in between the bucket and a t-handle on the top. All of these items can be customized to fit the user’s needs.

If you are just starting out in wetland delineation, you will probably be handed one of these bucket augers. There always seems to be one hiding in the office closet. Someone bought it, used it once, and there it sits.

I do not have a lot of pros to offer with this type of auger. The biggest problem is that it grinds up the soil profile, making it very hard to distinguish the hydric features of the soil. It also requires that once you auger down and grab a sample, you then have to tip the bucket upside down and bang out the sample. This also obscures the features. Soil scientists like these augers because they are trying to obtain a discrete sample at a specific depth. This is usually why the extension bars are so long. I have seen some augers used in the field that were over 6 feet long.

Dutch Auger (My Favorite)

This auger was made for wetland delineations. It is a double blade at the end of an extension bar and t-handle. It cuts a very nice sample without disturbing the profile integrity. You can usually auger down several feet fairly easily and lay out the samples in more or less the same way they would be found in the pit. You also get a decent amount of samples to play with. There are a number of brands and styles for this type of auger. The biggest difference between the individual styles is represented by the size and pitch of the blades. The original use of the Dutch auger was for muddy soils. However, there have been many modifications to the design. There is such a thing as a combination auger that works well in loamy soils as well as mud.

Sharp-Shooter

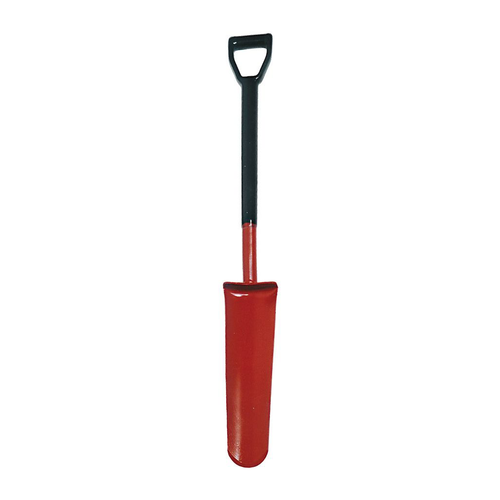
This is also known as a tree planting spade. It is simply a shovel that is 4 inches wide and 16 inches long. It digs a small hole and cuts a nice sample. In a pinch, this shovel will work in almost any circumstance. The biggest advantage to this sampler is the cost. You can pick one if these up in your local home improvement center for about $25. Most of the other augers mentioned are well north of $200. The biggest downside to this device is the work associated with it. Digging a hole is a lot of work. You get a nice amount of samples and you can even cut a nice sidewall to see the profile. However, this typically takes a lot of work due to the size of the spade.

Quick Connect or Not

One last note on the issue of quick connects. To be frank, I have yet to see one of these work once they were put to use in the field. The fittings get gummed up with dirt and the quick connect jams. I would suggest going with an all-welded design. You are not going to take these apart anyway so why spend the extra money? If you need to travel by airplane, TSA is not going to let you carry these on, so there is no need to break them down. Just check them, or better yet, buy a shovel for $25 when you get to the job site.

The Swamp School, LLC Partners with BadgeCert to Offer Digital Badges To Its Certificate Holders

Sample Badge Click to Verify

      For Immediate Release

                                                                                      Contact: Marc Seelinger 1-877-479-2673

Angier, North Carolina – October 26, 2021The Swamp School, LLC is pleased to announce its partnership with BadgeCert Inc., a leader in digital credentialing and professional recognition. The partnership allows The Swamp School, LLC certificants to immediately display a secure and verifiable digital badge on social networks, resumes, email signatures and websites.

In today’s digital world, professionals want the option to share their credentials online. Digital badges are used in professional and social networking environments to recognize achievements and establish credibility in real time with a single click.

BadgeCert digital badges are third-party verifiable icons that are packed with information or “metadata” about the issuing organization, as well as when and how the credential was earned and when it will expire. They can represent accomplishments such as knowledge competency, attendance, participation, or the completion of a professional credential.

 “We are excited to offer digital badge services through our new partnership with BadgeCert,” says Marc Seelinger, founder at The Swamp School, LLC, “Digital badges have gained significant traction in the credentialing industry and we have found that BadgeCert’s reliable security and verification capabilities will protect the integrity of our credentials while also giving our members the opportunity to digitally share their hard-earned credentials.”

“We are thrilled to partner with The Swamp School, LLC as they are a leader and pioneer in environmental education.  Moreover, they are consistently exceeding their members’ expectations with respect to professional advocacy and technology innovation,” says Ginger Malin, Ph.D., Founder and EVP of Business Development at BadgeCert.  “This partnership will provide The Swamp School, LLC members significant value as they can now digitally store and share their verified credentials across the web.” 

The Swamp School, LLC will begin offering digital badge services immediately. If you are a current student of the Swamp School and have already received a paper or PDF certificate and would like a digital badge, please contact the Swamp School via chat. The rollout is ongoing.

About The Swamp School, LLC

Based in Angier, North Carolina, the Swamp School offers post-secondary/college classes and webinars in wetland assessment, delineation and design, and other topics relating to the management of wetlands. The classes are designed to help environmental professionals enhance their skills and expand their business.

 Find out more about the Swamp School online at https://swampschool.riversagency.com

About BadgeCert

BadgeCert’s enterprise-class hosted software platform enables organizations to recognize their stakeholders’ accomplishments with dynamic digital badges.  BadgeCert’s 100% verifiable badges are embedded with qualifying information that details the nature of an earner’s accomplishment and once received, earners can share them with others (particularly employers, customers or colleagues) by putting them directly on their social media profiles, corporate databases, resumes or email signatures.

Visit http://www.badgecert.com

Certifications

The basic delineation class we offer is generally what most employers and their clients require. It is a 36-hour class that covers all the skills needed to do a wetland delineation. Upon successful competition of the class, you are ready to go to work.

The certification program that we offer is intended to advance your credentials as a wetland scientist. The program consists of 4 classes that run 12 weeks each, so it takes about a year to complete the program. The program was specialty designed to help identify true wetland delineation experts and serves to help them market their skills to potential clients. The basic delineation class is a prerequisite for this program, and it is suggested that the student have a couple years’ experience doing wetland delineations before starting the program.

Both sets of classes are accepted by the Society of Wetland Scientists as suitable continuing education for their Professional Wetland Scientist certification.

The US Army Corps of Engineers and the US EPA do not pre-approve any wetland training. However, many of our students come from both agencies and we are a Federal General Services Agency (GSA) approved vendor for wetland classes.

Webinar Help

Webinar Access

There is no special link to log into the webinar.  The broadcast is sent out on our Swamp School Virtual Classroom page.  It is not a Zoom, Teams or similar call.

To get to the webinar go to SwampSchool.org and log in using your registered email.  A password was  sent to that email.  If you need to reset it, you can use the password reset on the login page.  Once you are logged in look for the “My Courses” tab.  From there you will see your webinar.  Click it and it will take you to the class page.  The live broadcast is about halfway down the page.

Once you are logged in, try the broadcast link to make sure you can login on the day of the webinar.  A sample video will play before the webinar.  Please try this out beforehand to troubleshoot any connection issues.

Screen Freeze

During the webinar if you lose video or audio, do a screen refresh.  This will reconnect with the broadcast and fixes most connection issues.

Blank Video Screen

If you see a blank screen, you have a firewall installed either on your computer or the company server and it is blocking our broadcast.  You will need to have your IT team help you with this if you are on a company server or VPN.  Please try this out before the live broadcast by using the sample video.

Audio Not Playing

Audio issues can also be fixed with a screen refresh.  However, some company firewalls will also block audio as well as video broadcasts.

You do not need a microphone or call in number.  All students are muted, but you can chat in during the webinar using the class chat.

Only one user per paid seat can log in at a time. 

If you are trying to watch this using the same user email from multiple computers, you will be temporally locked out.  You will need to log out of all the other computers and log back in on only one.  If you need multiple seats, please go back to the store and purchase them.  Be sure to use unique emails for each seat as they serve as the username.

Additional Help

If you need any extra help, please start a chat on SwampSchool.org.  This is the fastest way to get help.  You can call, but this is slower.

Webinar Re-Broadcast

The rebroadcast will be posted to the class site on Friday and will be available for 60 days.

Biden’s WOTUS Updates

Wetland Wednesday

July 7, 2021

Get some tips on finding a great wetland job!

The “latest” WOTUS updates from the Biden Administration.

2021 Wetland Job Tips

Wetland Wednesday

May 13, 2021

Get some tips on finding a great wetland job!

If you are looking for a job or looking for help use our free wetlands jobs board.